The subject of the "right" setup will probably never garner universal agreement, but it can generate some interesting discussion. One well-known polemic on the subject can be found on the Velominati site (see The Rules) and the subject was recently discussed at length on the Classic Rendezvous Google group. It can be fun to hear different people's opinions on the "proper" setup -- and so here are my Retrogrouch Rules on Proper Bike Setup.
 |
| For a classic steel race bike, it would be hard to find fault with this. |
 |
| There ought to be a law against this. |
For saddle height, the old rule in the classic era was a "fistful of post" (maybe 4 - 5") though on road racing bikes from at least about the '70s and later, because of evolutionary changes in geometry, expect to see a little more than a fistful. Larger frames will often have (and/or need) a little more seat post showing than on smaller frames. But on a classic steel road bike, having a whole lot of seatpost showing (like 7" or more) is a sign that the frame is probably too small for the rider.
Bars:
There are a number of variations on the classic drop bar - some with deeper or shallower drops, some with ramps that are roughly parallel to the drops, and some that have ramps that dive steeply to the brake levers. It seems to me that most of them look best when the drops point down slightly from level, with the bar ends pointing in the vicinity of the rear brake. This has a practical reason, because when riding down in the drops, having a bit of a downward angle makes for a more natural hand/wrist position for most riders.
On a classic road racing bike, like the Colnago shown above, the tops of the bars might be somewhere between 1 - 3 inches below the top of the saddle. On a more touring-oriented bike, the difference in height would likely be less. More than 3 inches in difference is another indication that the frame might be too small for the rider. Yes, some people like to "slam" the stem all the way down to the headset, but on a classic steel bike, I think that looks affected.
Brake Levers and Cables:
Line up the lower tips of the brake levers with the bottom of the handlebar drops. The way I do that is with a straight edge (a piece of aluminum flat bar stock works well) and a rubber band. I affix the straight edge to the handlebar end using the rubber band. It then projects forward at the same angle as the drops, and I can then adjust brake lever position so they just touch the straight edge.
Not "too much" cable! If the cables exit from the top of the brake levers, as opposed to aero routing under the bar tape, then there should not be huge loops of cable springing up over the bars. Enough for a smooth arch, and enough that the cables don't bind when the bars are turned or the brakes are applied. Also, it just looks "right" if the arches of cable on the left and right are balanced. It can help to start with the front cable -- get a smooth arch from the lever to the brake caliper, passing up and over the bar. Then get the rear cable to match the size/height of the arch up front - cross the cables behind the bars - then work on the arch at the rear of the bike too. Again, smooth, not too much cable. It should exit the rear cable guide gently in a continuous arc. Too long, and there will be double curves. Too short, and it will pull or bind when the rear brake is applied.
If it worked for Eddy. . .
A lot of riders from the baby boom era or earlier like to say "if it worked for Eddy . . ." So here are Eddy's brake cables:
 |
| Smooth, even arches. No huge loops of excess cable. |
Wheels, Quick Releases, and Tires:
On a classic steel road bike, black sidewalls are practically a crime against nature. It's possibly acceptable on a bloated carpet fiber frame with carpet fiber rims - but looks bad on a classic vintage road machine. When using clincher tires, the tire labels should be lined up with the valve stem. That's not just an aesthetic affectation -- it can help when it comes time to locate and fix a punctured tire. On sew-ups, the label placement is up to the mercy of the manufacturer, but to the best of my knowledge, many of them line up that way (though not all of them). Labels should be visible/readable from the drive side of the bike.
On a bike with horizontal dropouts in back, I've seen different recommendations for wheel placement. Some reputable and well-respected enthusiasts insist that on a racing bike, the wheel should be as far forward in the slot as possible, giving the shortest possible wheelbase. I'm more of the opinion that it should be centered in the dropout, so that the line of the seatstay intersects the center of the wheel axle. To my eye that just looks best.
Quick release location is practically a religious issue, but I have my preferences. Functionally, I think it best when the lever is closed so that it is roughly parallel to the fork blade in front, or the seatstay in the rear. It is easier to close the lever when you can wrap a hand around the lever and the frame member, and easier to open it again if it doesn't cross over the frame member. Visually, it looks good when both of the levers point to the rear of the bike, so I find that acceptable.
Again, refer to Eddy. . .
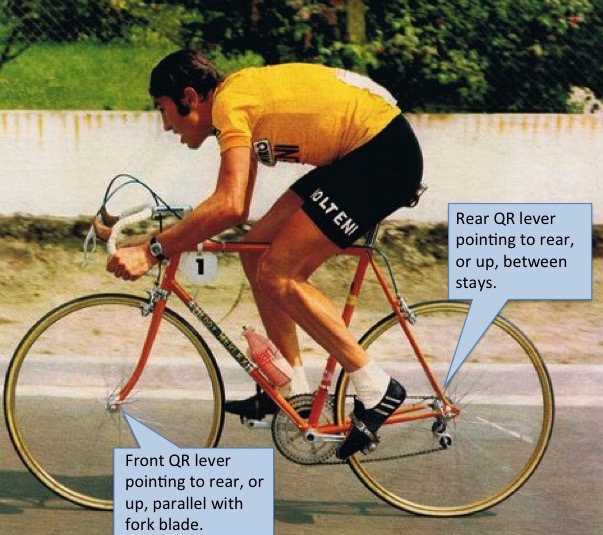 |
| Eddy's front QR lever points back to the rear wheel. His rear QR points up at his saddle, roughly parallel to the seatstay. However, he wasn't always consistent with that. I've seen photos of Eddy racing where both levers pointed to the rear of the bike, and a couple where the front lever pointed upward, roughly parallel to the fork blade. |
Disclaimers:
 |
| Taking a close look at my '73 Mercian, I'm thinking I might need to trim a little off those brake cables. Otherwise, looking pretty good. |
Do all my bikes strictly adhere? Well, looking closely at them, it might be possible to find a discrepancy or two here and there, but it's pretty clear that these aesthetic considerations are something I strive for when I build a bike.
Anybody got anything to add to the list?
i was once told by a pro mechanic that the brake cable loop should have enough room between the bars and housing to be able to fit a water bottle in one's hand -in case there was a sudden need to grab the bars whilst drinking. Seems a bit large to me, and in such an emergency one should probably just jettison the bottle!
ReplyDeleteA trackie coach told us that track tyres should be mounted with the label on the left side to minimise the chance of slipping against the banking- though i find this advice questionable.
Many racers would set the drops parallel to the top tube, with the stem "slammed."
Back in the late 70's it was not uncommon to see racers around here riding bikes that could have been considered 1" or 2" too small, with seat post up to the limit line, the theory being that a smaller frame would be "stiffer." i fell for that myth once, and my back almost never forgave me...
I remember those days when the fashion was to ride the smallest possible frame size for a racing bike. Nowadays I'm quite convinced that my ideal frame size is about 60 cm - but "back in the day" I had been persuaded to ride 58 or even 57. Even still, on a bike with a level top tube, that still only meant having about 6 inches of seat post showing. Most of my bikes today have somewhere around 5 inches of post, which is just a bit more than a fistful (like a 6-fingered fist, instead of 5).
DeleteYes, clincher tyre labels should be aligned with valves, but they should be on the left hand side of the bike. Why? Because when you fix a rear puncture, you work from the non-drive side of the wheel.
ReplyDeleteThere are many tires that have an intentional "direction" for the tread. Usually, if you install the tires for the correct direction, they will have the label on the right (or drive) side. Also - why would you necessarily work from the non-drive side when fixing a flat?
DeleteBecause when you remove and refit the inner tube you don't want it to touch the oily sprockets. At least, that's what I was taught many years ago... perhaps tread directionality is a relatively recent development?
DeleteI place inflation info at valve , baby powder, between tire and tube, spare tube in ziploc with BP. Bibendum lives !
DeleteYears back I rode a 60//61cm frame. As I got older the frame size started coming down to 59 then 58 and now at 77 years old I am very comfortable on a 57 even 56cm frame. Not only does the smaller size fit my aging anatomy but I appreciate the lighter weight frame. I also rode Brooks saddles for many years. Lately I find much more comfort in the Selle Italia Turbo saddle which I could never get use to at a younger age. Age is a factor in everything.
ReplyDeleteGreat post!
ReplyDeleteThe only thing I would take issue with is rear wheel placement in horizontal dropouts. This is more than just an aesthetic consideration. The rear wheel should should be placed so that the chain gap between the derailer jockey pulley and the cogs is about two links. Any more than that, and the derailer will shift late. If one centers the axle at the intersection of the stays, as you suggest, it will usually be too far aft with most set ups.
Interesting point. That does bring up an advantage to horizontal dropouts in that you can fine tune the axle placement for better shifting depending on different cog sizes and different derailleurs. How much difference I couldn't say, as I've got some bikes with vertical dropouts and there's no way to alter the placement yet shifting doesn't seem to suffer.
DeleteOver the years I've seen a few fixed gears sporting a lot of "slope" as you pointed out. Often these same bikes also have an extreme forward pitch to the bars, a condition known as "yates" after 80's pro Sean Yates who seemed to like his bars that way. I'm not sure whats going on there, but I think it's a vain attempt to mimic the deep hooks of a track bar but with a road bar. Perhaps it's meant to project some aggressive posture on the bike. In any case it looks ridiculous. When I see this set-up I subconsciously deduct 30 IQ points from the owners assumed intelligence.
ReplyDeleteAbout quick release levers I always point them straight to the rear. This is a hold over from my mountain biking days. If they point to the rear they are less likely to be flipped open when you are crashing through scrubby underbrush.
I have nothing to add, other than the dramatically downward tilted saddle makes my eye do that twitchy thing, just wanna smack some sense those people! =:D
ReplyDeleteI am weirdly insistent on lining up tire-label with the valve stem and it being on the drive side. I don't even recall ever being "taught" that, it's just how it's always been. The bike doesn't ride the same otherwise. :)
ReplyDeleteOne other old-school bikey thing: Putting a twist in your toe straps when you feed them through the pedals to keep 'em from sliding out.
Another one comes to mind that was popular when I was younger: Fresh white tape on your bars before a race.
Wolf.
The twisted toe strap -- That's another good one. Thanks!
DeleteThere's two reasons to do this.
Delete1. When I worked at an LBS, the owner told me to "front the product". In grocery stores you'll see the hired help rotating the labels forward, on bikes, the tire manufacturer should be on at the stem so you know what to buy when you need a new one - you'll have to remove the tube by the stem to get it off.
2. (better reason)-if you always do this, when you have a flat and can't immediately find the leak, you'll probably pull the tube out. When you find the leak in the tube, you can figure out where on the tire the offensive bit came through. if it's a pinch flat, you can check the casing to make sure it wasn't damaged, lining up the tube "vampire bite" with the tire.
Oh Man, you're a brave Dude starting this conversation.
ReplyDeleteWhen I was a boy...
There was a fad for a while for having the front QR on the right(wrong) side of the fork. The lever nestled in behind the fork blade giving you a TREMENDOUS aerodramatic advantage. I stopped doing it when I realized it made me look like the kind of Dork that would care about that.
I have to say I agree with pretty much everything you illustrated up there. My bikes all follow that pattern more or less(so you must be an intelligent, deep thinking person too) but I can add a couple of other things as well...
Saddles centered in the middle of the adjustment range, front to rear. If you have that saddle jammed all the way forward you are either a closeted Tri-Athlete or in need of a longer stem. All the way back and you really should be thinking about a Harley.
Bolt on water bottle cages NEED to be near(ish) the bottom of the down tube, allowing for adequate crank/pedal clearance of course. If it's way up near the shifters you lose points. If you have braze-ons that force the cage up to the middle of the down-tube it's a sign the framebuilder was the worst type of fraud.
When using a single clip to carry a pump on the seat-tube, the pump MUST rest in the angle between the seat-tube and the down-tube with the clip in the area just under the seat-lug. Mounting the clip somewhere near the bottom of the seat-tube puts the pump too high, insulting the eye and raising the center of gravity of the bicycle to an insanely unsafe degree. It's unnecessary to mention that the pump will be mounted in front of the seat-tube. So I won't.
At some point we should discuss saddles that fail to adhere to the rules of good taste in regards to color.
Perhaps another day?
Spindizzy
P.S. That Colnago is BOSS btw.
Bad saddles - yes -- and bar tape, too. Remember "splash" bar tape, with the multiple colors? Yes - that could be a Part Two.
DeleteThe other day on one of the online bike forums there was a thread about a bike store somewhere that found an early 70's Raleigh (International I think) in the basement still in the original shipping box. They built it up and put it on display.
DeleteThe photos showed that they had routed the (non-aero) brake cables UNDER the handleba. Unfortunately, there's no way you can un-see that!
I've also seen young mechanics route toe-clip straps with the buckle on the inside.
Oh yes -- I saw that listing on eBay. That cable routing looked very amateurish. I was intrigued by the fact that they had a 40 year old bike still in the box. But I would have much preferred to buy it in that original packaging, and I'd have very much enjoyed unpacking it and assembling it myself. I believe they got a good price for it, nevertheless.
DeleteI struggle with getting the cable housing between the stop on the chainstay and the derailer the right length. Seems as if there's a fine line beteeen "looks too long" and "looks too short". As long as it doesn't affect the derailer's fuction I guess it doesn't matter, but any guidance for that?
DeleteHalfway between "looks too long" and "looks too short" should be perfect. ;)
DeleteThe arc of the cable should terminate at the adjuster barrel such that the radius is perpendicular with the line of the cable continuing to the pinch bolt.
DeleteCampagnolo 617 gear cable housing was 22 cm long, so that's the correct length. Right?
DeleteThanks for the link to a great collection of bikes with beautiful setup. There must be interesting stories behind bikes made by Teledyne and especially Exxon. I recall that the Graftek was more than twice the price of a fine steel bike of its era, but I always wondered why it was made in the first place. Another early carbon bike came from Mossberg, maker of quality firearms.
ReplyDeleteWhile I agree with most of the aesthetic choices you suggest, other than the functional ones (seat, tire labels, QR), I don't fret over what others do. I don't really want their advice (usually how old and heavy my bike is, and why don't I have STI like any normal person), and I don't offer my unsolicited thoughts about how ugly theirs is. I chime in only on matters of safety (loose QRs, released brakes, damaged tires, etc.) unless asked. If they like their bar at some other angle, so be it.
Jon
Ditto on tire labels lined up with valves, and facing drive side. It does help when diagnosing flat puncture locations....
ReplyDeleteSplash tape? You mean cork vomit? Ugh.
Don't get me started on "alternative saddles".....
I have a *gasp* disc brake touring bike, and I've moved the QRs to the right side. It makes it easier to avoid touching the discs when removing and reinstalling wheels, which can cause the brakes to squeal and/or lose performance. Yes, I know, another downside of disc brakes.
ReplyDeleteThe front one is up and parallel to the fork, and the rear faces forward.
I'm not sure if this is a retrogrouch thing or just a basic function thing, but there seems to be a consensus on chain length, so that when the rear derailleur is in a center cog, the body of the derailleur is more or less vertical. Not sure which chainring should be in use for that, though, the outer I assume. I have noticed a lot of retail bikes set up with a chain that has not been shortened, requiring the derailleur to pick up way too much slack and almost pointing straight back.
ReplyDeleteLook it up on Sheldon Brown, it's much more to do with derailleur function than aesthetics. The optimum length is found by threading the chain Biggest ring to biggest cog (without going through the jockey wheels) plus one full link. Works wonderfully.
DeleteMy ride is a vintage GT Timberline mountain bike converted into a commuter/daily driver, which means that it violates most of the guidelines above. The saddle is level, and is in fact level with the height of the flat handlebars. The seatpost is set fairly low, maybe 2 inches showing, though the guys at the local bike shop like to jack it up every time that I bring the bike in for service. It is something that works well for me. I started with the seatpost high, and lowered it a little bit after each test ride, until it fit just right.
ReplyDeleteLast year as I approached 65, I 'Petersen-ized' the stem on my 1982 TREK 710 frame... replaced the original sleek SR Royal (1A clone) with a high rise Technomic. Bottom line is that my back appreciated the switch , but this formally beautifully proportioned looking bike now looks odd every time I approach it.
ReplyDeleteMy 1981 Viner Special Professional will never give up the 2.5" of visible stem.
So, I guess I have the best of both worlds.
PS speaking of Mavic's quality, the TREK's G40s haven't needed truing in 30 years.
Saw the pic of your Mercian, almost fainted dead away at those crazy huge loops of cable...! Seriously though, not many people will know or care how you have your bike set up, but when a congnocenti gives props, it is all worth it. A few years back I was pumping the tires on my early 80s Koga Miyata steel race bike. A woman walking by said "moie fiets!". I feel good about it to this day.
ReplyDeleteI once got a compliment on my bar wrapping (cloth tape and shellac - matched my honey Brooks saddle) from no less than Richard Sachs. Still feel good about it years later.
DeleteOne of my favourites is when building a wheel that the logo on the hub should be visible when looking through the valve hole in the rim.
ReplyDeleteI did a story last year about building wheels and mentioned that little detail. Funny, but I built a lot of wheels before hearing that one. I use Jobst Brandt's book as my guide, and I don't believe he ever mentions such a thing. It's a neat detail, but I've yet to hear a compelling functional reason for it.
DeleteThat's called an "upskirt" view. No lie; sorry, can't find the so-captioned photo. It just shows that the wheelbuilder was able, at the time of inserting the first spoke, to think ahead as to how the parts would line up when the hub was rotated (relative to the rim) later in the lacing process. Depends on the cross number.
Delete-Leslie